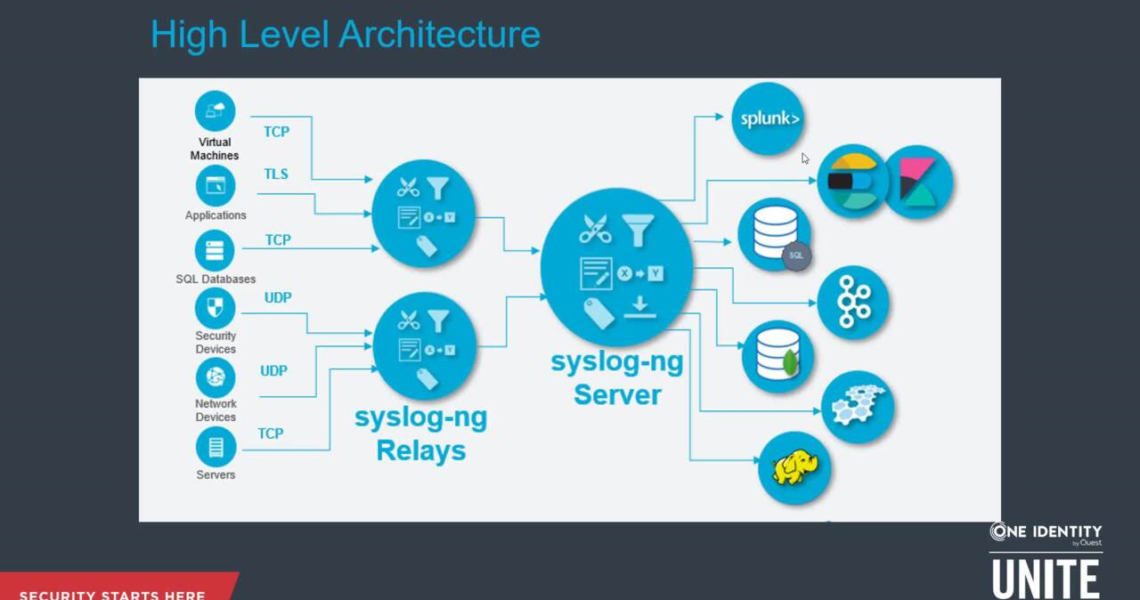
Sending your log data in realtime with Syslog-ng.
1 December 2022Syslog-ng is an open-source daemon that sends system logs and can act as a log forwarder over files you want to follow. We will show you in this chapter how to send log data with this good alternative to Rsyslog.
This daemon is available for free in Unix with a simple apt-get install syslog-ng (or yum install syslog-ng depending on your OS). We assume in the following that Syslog-ng is already installed on your machine.
Table of Contents
Forward Syslog messages

To configure the daemon, you have to edit thesyslog-ng.conf file which usually resides in/etc/syslog-ng/syslog-ng.conf.
sudo vim /etc/syslog-ng/syslog-ng.conf
You should have a sample a pre-filled configuration file that comes with the installation of Syslog-ng. You can see that for configuring a log path, you have to define at least three things:
- A source: where your log comes from.
- A destination: where your log should go.
- A path: to link the source and the destination.
For Syslog messages, the source you used should have the following function:
sources_src {
system();
internal();
};
This source is usually configured by default in your configuration file.
We have to format these messages in the RFC-5424 syntax and attach your api key to recognize you. We then need to define an appropriate template.
We are also going to use the Logmatic.io‘s tcp protocol that is available over the address api.logmatic.io on port 10514.
To do this, add in your configuration file the following line at the end of Destination section:
# Forlogmatic platform

template LogmaticFormat { template(“YOUR_API_KEY <${PRI}>1 ${ISODATE} ${HOST:–} ${PROGRAM:–} ${PID:–} ${MSGID:–} ${SDATA:–} $MSG\n”); };
destinationd_logmatic { tcp(“api.logmatic.io” port(10514) template(LogmaticFormat)); };
Don’t forget to replace YOUR_API_KEY by one of the api keys you have created.
Finally, you have to link your s_src source and d_logmatic destination by adding the following line at the end of Log path section:
log { source(s_src); destination(d_logmatic); };
Once you have saved your file, restart Syslog-ng to apply your modifications:
sudo service syslog-ng restart
What does it look like?
Because the log stream is sent in the RFC-5424 format, the platform properly parses Syslog’s attributes such as: hostname, appname, facility, severity, etc… As shown in the sample below:
{
“message”: “(root) CMD ( cd / && run-parts –report /etc/cron.hourly)”,
“syslog: {
“prival”: 78,
“severity”: “Informational”,
“facility”: “Clock Deamon”,
“version”: 0,
“appname”: “CRON”,
“hostname”: “analytics-2”,
“timestamp”: “2015-04-21T15:17:01.794521+00:00”,
}
}
You can now send standard logs from multiple servers and applications and quickly segregate them in the exploration view:
Enabling security
You can set up encryption for Syslog-ng with certificate validation.
To activate the SSL encryption, please replace d_logmatic destination by the following line:
destinationd_logmatic { tcp(
“api.logmatic.io”
port(10515)
template(LogmaticFormat)
tls(peer-verify(required-untrusted) cert-file(“path/to/your/cert/file.crt”))
);
};
Be sure that you have correctly written the path to your .crt file, and that the port number is 10515.
Once you have done this, don’t forget to restart the service:
sudo service syslog-ng restart
Watching your own files
To use Syslog-ng as a log forwarder is decently easy. Please follow these steps:
- Add sources which will tail your files:
sources_files {
file(“path/to/your/file1.log”,flags(no-parse),follow_freq(1),program_override(“”));
file(“path/to/your/file2.log”,flags(no-parse),follow_freq(1),program_override(“”));
};
…
- Link your new source to d_logmatic destination by adding the following log paths:
log { source(s_files); destination(d_logmatic); };
…
Once you have done this, don’t forget to restart the service:
sudo service syslog-ng restart