How To Configure Your Webcam For Better Quality.
3 December 2022Unhappy with your webcam’s performance? If you are, or if you’re not, either way, this post is aimed at helping you get the maximum out of your webcam – by optimizing it for better images and videos. We’re going to try out all possible settings that are available in a webcam, the basic ones; using AMCAP.
AMCAP is a simple Video capturing tool. Its basic function is to get the images from the webcam and capture them. It has all the basic options and yes, the settings too. We are only going to make use of its settings to tune our webcam.
To begin with, you need to download AMCAP. It is included in the CIF Single Chip Webcam Drivers package I had added earlier.
Download
- via RapidShare
- via MediaFire
- via EasyShare
After downloading, you can either extract it to any folder, though it’s not required.
The Webcam Optimization Process
Basically, what we are going to do is use AMCAP to change various settings like Brightness, Contrast, Hue, etc until we get the best picture quality possible.
Let’s get started:
- Run AMCAP.exe Choose your Webcam from the Devices menu.

Choosing your Device
- Click on Options -> Preview. Now you will be able to see your device’s live input into the AMCAP frame.

Previewing your Webcam
- Time to get into the settings. Move to Options -> Video Capture Filter… This will bring up the Properties. The properties have all those required options that we need to adjust to have a better picture via the webcam.
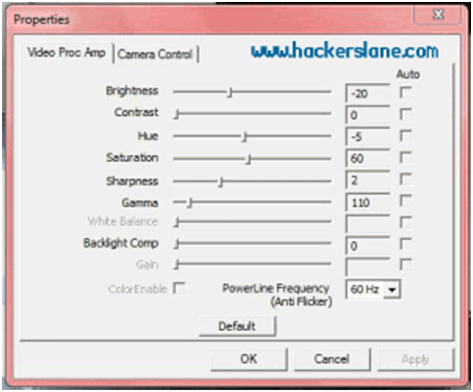
AMCAP Properties
- You can see my configuration in the above picture. Try changing the values of all the aspects, one by one, and Apply and press OK when you get the best of all possiuble configurations. If you mess around the configuration and start over again, press the Default button. This will reset the settings to default.