Know About The Jailbreak Everything And How Perform Pentesting On ios Application.
3 January 2022As we announced in the first article of the series “Pentesting guide in iOS applications”, today we bring you all the necessary information related to the world of jailbreak so that you can tackle the pentesting on iOS applications. Although this series of articles is not intended to be a pentesting course, it is important to highlight some requirements and generalities about this methodology in iOS applications.

In general terms, we could say that two analysis approaches are used in the pentesting methodology for applications: static analysis and dynamic analysis. As we can guess, the static analysis is the one that covers all the tests while the application is not running. In this approach, whenever we analyze an iOS application we will do so from its IPA file , which we will talk about in more detail in other installments. As for dynamic analysis, as its name implies, it refers to tests that are carried out while the application is running. The truth is that to fully analyze (static analysis / dynamic analysis) an iOS application it will be necessary that we have an Apple PC in any of its variants, together with a AppleID that we will use from the Apple IDE ( Xcode ), which provides us with many analysis tools and above all allows us to manipulate our applications by giving us the possibility of signing them (as long as we have an AppleID with a porvisioning profilevalid), added to a device model (iPhone or iPad) for which there is a jailbreak version available and that applies to the OS that has said device installed. On the other hand, it should be noted that it is extremely important to take into account that the device that we select to jailbreak and test our applications should be used only for the use of audit and laboratory tests and that we should not think about using a device for this. containing personal information.
Table of Contents
What is Jailbreak?
As we have already anticipated in the first installment of this series , jailbreak is a process that allows us to elevate privileges in iOS systems, giving us the possibility of breaking many of the security mechanisms. Undoubtedly, jailbreak can be compared to the process of rooting in devices that run Android, although it is important to note with respect to jailbreak that it refers only to the process of breaking the security mechanisms imposed by Apple in order to elevate privileges over it. system.
The first method to jailbreak was released in July 2007 and initially allowed you to set any music file recorded on the device as the ringtone for incoming calls and messages. Then, in August 2007, the first non-Apple-approved game for the iPhone and iPod Touch was released. And in October of that same year, another method to jailbreak was discovered. It is worth clarifying that jailbreak should not be confused with the tools or exploits that are used to execute the jailbreak process itself. In general, after a successful jailbreak, the device’s FileSystem is no longer mounted as ReadOnly (write only) to Read-Write (read / write), which allows manipulating files on the system and interacting with it as a user root,completely disregarding the use of the mobile user that iOS uses by default.
As you can imagine, from the point of view of pentesting, the jailbreak becomes a fundamental tool when carrying out security audits, since once the jailbreak is carried out, we will be able to access the internal directories, the keychain , install third-party tools. , access the process memory, perform Bypass TLS and perform debugging in real time, among other features that become fundamental tools, especially for carrying out dynamic analysis.
Existing jailbreak types
Although when it comes to jailbreaking a device, there is talk of “types” of jailbreak, we could rather say that each of these refers to the virtues and limitations offered by the different tools and exploits available to achieve jailbreak on a device.
Next, we can see the different characteristics and “types” of jailbreak available. As we said, they depend on the type of tools and / or exploits that are used, the latter may be of the software type (also known as userland ) or of the hardware type (that operate on the firmware), such as those that affect iBoot or the DFU .
Jailbreak Untethered
Normally, when a device is jailbroken, it is lost when the system is restarted. When we talk about jailbreak untethered, the opposite happens: you do not lose the jailbreack when you restart the phone . This means that the kernel is patched without the help of a computer or application. The device remains jailbroken no matter it is rebooted or shut down and it is for this advantage that these types of jailbreak are the most sought after, although they are rare and require a great deal of reverse engineering to create them. The latter in turn made them less and less popular, as none are compatible with recent versions of iOS.
Jailbreak Tethered
It is a type of temporary jailbreak that is lost when the device is restarted, leaving it in a bootloop that requires the device to be connected to a computer to jailbreak each time it is restarted.
Semi-Tethered Jailbreak
The jailbreak is lost when the device is restarted, but the equipment will turn on normally (phone calls, text messages and / or use of applications and AppStore are working), it will only be enough to run the jailbreak again, although with the device connected to a computer.
Semi-Untethered Jailbreak
This type of jailbreak is similar to the semi-tethered jailbreak in that when the device reboots the jailbreak is lost, but the key difference is that the kernel can be patched without using a computer. It is usually patched using an application installed on the device. Sometimes this type of jailbreak does not require connecting the device to a PC.
It is logical to wonder how the different types of jailbreak have been achieved after so much effort by Apple to improve the security of its devices. The truth is that since the beginning of the jailbreak the developers and Apple have been playing cat and mouse. And it is that after several years since its birth, the jailbreak continues to be a challenge for Apple. Over time, he has had to face irremediable situations many times, such as when checkm8 was born, a bootrom (read-only boot memory written to hardware) exploit used to run unsigned code on iOS devices, making it impossible for Apple to patch these flaws. As a result of this, many device models were permanently vulnerable, forcing their users to directly change their equipment.
On the other hand, it should be noted that the jailbreak is considered absolutely legal, since once users have obtained their devices, they have the right to do whatever they want with them.
How to Jailbreak?
As we have mentioned previously, in principle it will be essential to review the version of the device that we will use and the version of the operating system that it brings with it, since there are no jailbreaks available for all devices or versions of operating systems. Next, we share a table in which we can find some available jailbreaks according to the different existing versions of iOS.
| IOS version | Jailbreaks available |
| iOS 11.0 – 13.3 | Unc0ver |
| iOS 12 – 12.4 | Chimera |
| iOS 12.3 and up | Checkra1n |
On the theiphonewiki site we can find a lot of relevant information related to the different versions of jailbreaks available and related topics.
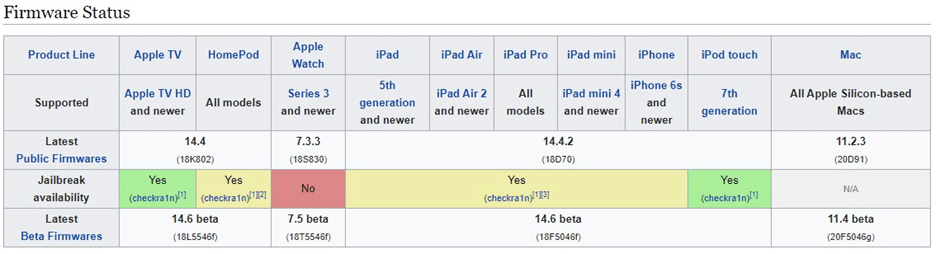
or our test we will use an iPhone 6s device with iOS 14.2. For this model and version we see that there are some “types” of jailbreak available, which we will analyze in order to have different options available. Our first case will be using a jailbreak called Checkra1n , which is neither more nor less than a powerful program that from the checkm8 exploit allows us to create a Semi-tethered type jailbreak (since this exploit works by taking advantage of a stack overflow in the USB DFU stack ), which of course implies that the jailbreak is lost when the device is restarted and also requires having a PC (in this case not necessarily Mac) to be able to carry out its execution.
Jailbreaking with Checkra1n
As we said, for our first case the tool that we will use will be Checkra1n, which we can download from its official site .
Once the installer is downloaded, we proceed to install Checkra1n. Then we run it and connect our device to the PC. As we can see in Image 3, checkra1n detected our device and offers us a “wizard” to carry out the entire jailbreaking process.
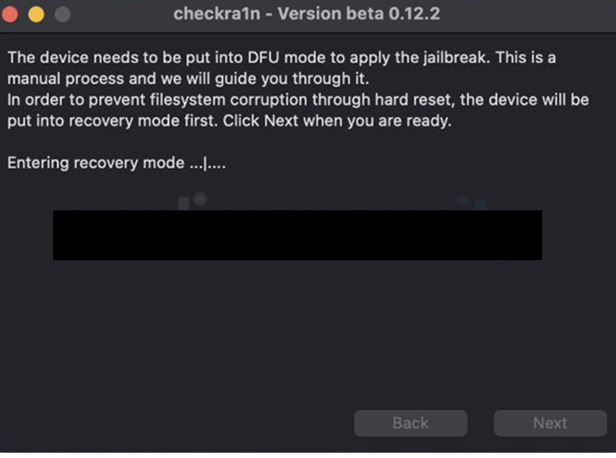
We click on “start” and we will see that the process begins by placing our device in DFU (Device Firmware Update) mode to prevent any problem that may arise with the device.
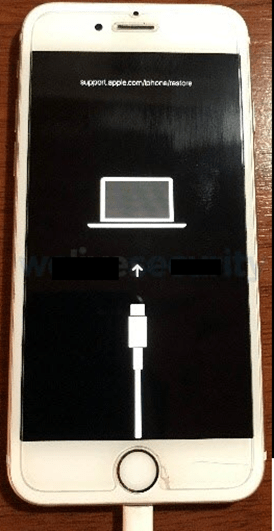
Once the DFU mode has started, the installer indicates the series of steps to follow. We start by clicking start, and then hold down the Home and Side buttons (at the same time) of our device for four seconds, and then we release the Side button, leaving only the Home button pressed until the installation and boot process of the jailbreak begins.

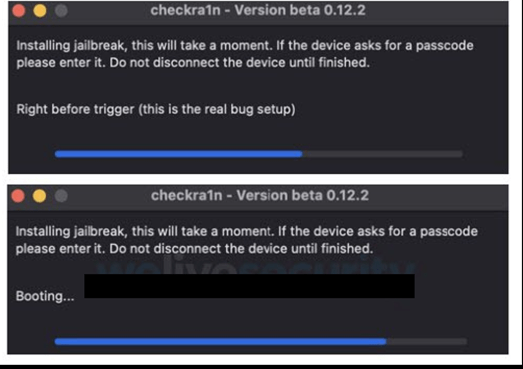
As we can see in Image , while the boot process is taking place we will see on the screen of our device how the jailbreak is executed.
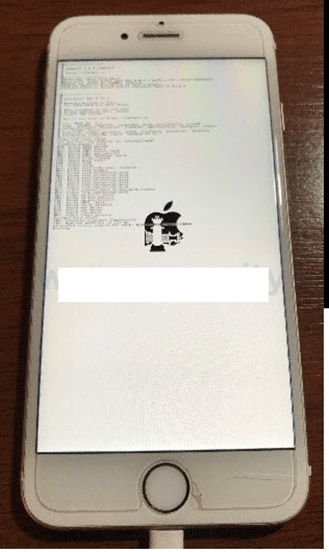
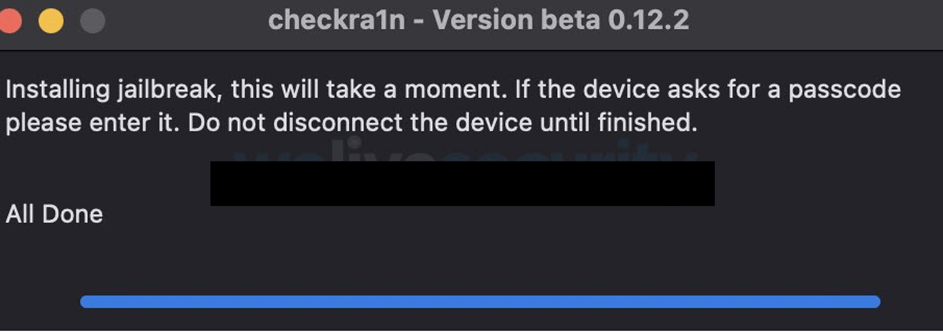
Once this process is finished, on the computer we will see a checkra1n message that tells us “All Done” and that indicates that the process has finished.
As can be seen in Image 8, once the system has started, we will see on our device that two applications have been incorporated into our springboard , which are “checkra1n” and “Cydia” itself. The latter is installed automatically by Checkra1n and will guide us to verify that our jailbreak has been deployed correctly.
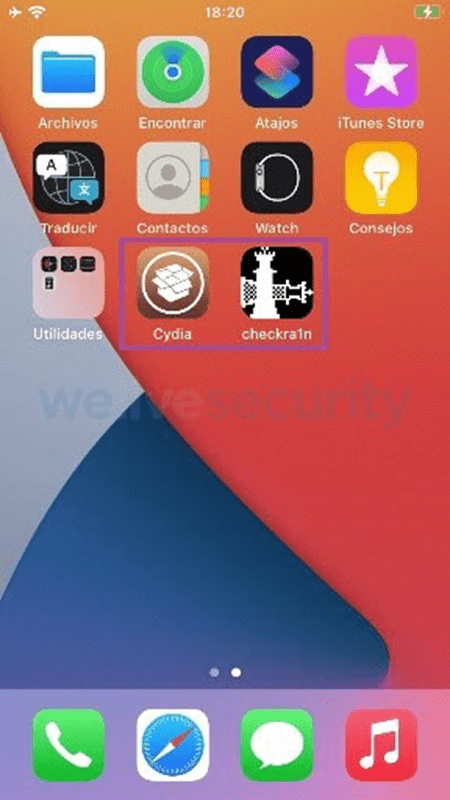
If we open Cydia and we can see its main screen, as shown in Image 9 below, we can consider that the jailbreak was successfully deployed. If when trying to open the application it closes automatically, we can consider that the jailbreak was not carried out successfully and it will be necessary to run it again.
As we can see, if we open Cydia we will find the repository menu. When the time comes, the idea here will be that we add various sources that will allow us to install the different applications that we need to carry out our security tests.
Without a doubt, we can say that the jailbreak process with checkra1n is very simple. It really is a very powerful and stable tool that incorporates the installation of a third-party repository (Cydia), which we would have to install manually if we use other types of software to jailbreak.
As we have mentioned before, it is true that many times when performing jailbreak there may be various problems that lead us to have to carry out the process more than once to achieve it, or in many cases the need to use an alternative jailbreak will even arise to achieve success the process. Therefore, below we will see how we can use an alternative method to Checkra1n to jailbreak. Depending on the performance of our device, we use the Unc0ver tool, which allows us to install a semi-untethered type jailbreak on our device. The disadvantage of this tool is that it is presented in IPA format and forces us to have to sign this file in order to install it on our device, but there are some alternatives that we will see below that will allow us to sign and install this file on the computer.
Jailbreaking with Unc0ver and Cydia Impactor
In principle we know that we are going to have the Unc0ver .ipa file and that we need to install it on our device. To do this, the simplest way could be to rely on a tool called Cydia Impactor , which would allow us to install the Unc0ver .ipa file on our device. Now, before working with Cydia Impactor and Unc0ver will be necessary to generate a AppleID, preferably with profile AppleDeveloper (which will help us to get the profile provisioning valid to sign our applications), we can generate from the following link and then, as shown in the following images, access the security preferences of our AppleID user and generate a one-time password that we will later use with Cydia Impactor.
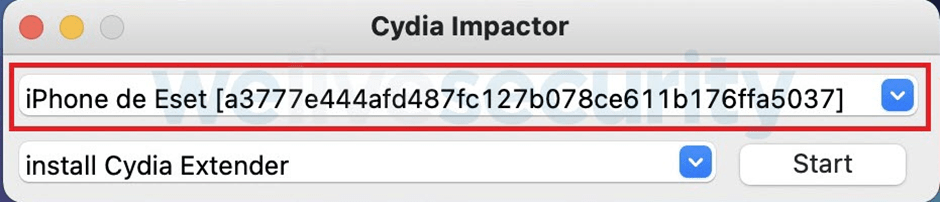
Once our AppleID is created and configured, we will need to download the Cydia Impactor system from its official site and proceed to install it. Once installed, we connect our device to the PC and open Cydia Impactor which, as seen below, recognizes the connected device.
Once we have Cydia Impactor installed, download the IPA file from Unc0ver by clicking on the following link , then locate the downloaded file and drag it to Cydia Impactor.
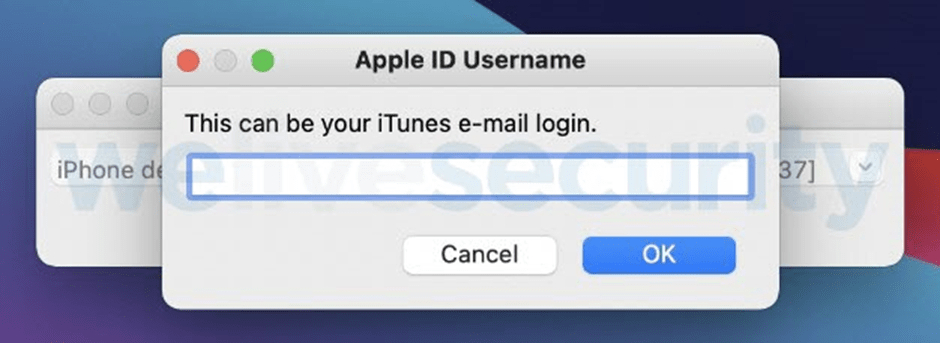
As shown below, Cydia Impactor will ask us for our AppleID and the one-time password that we previously generated to start the installation of the IPA file (Unc0ver) on our device.
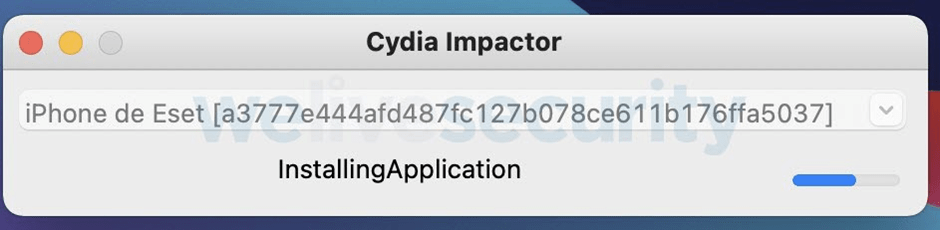
Once the process is finished we will see that the Unc0ver application is added to the springboard of our device.
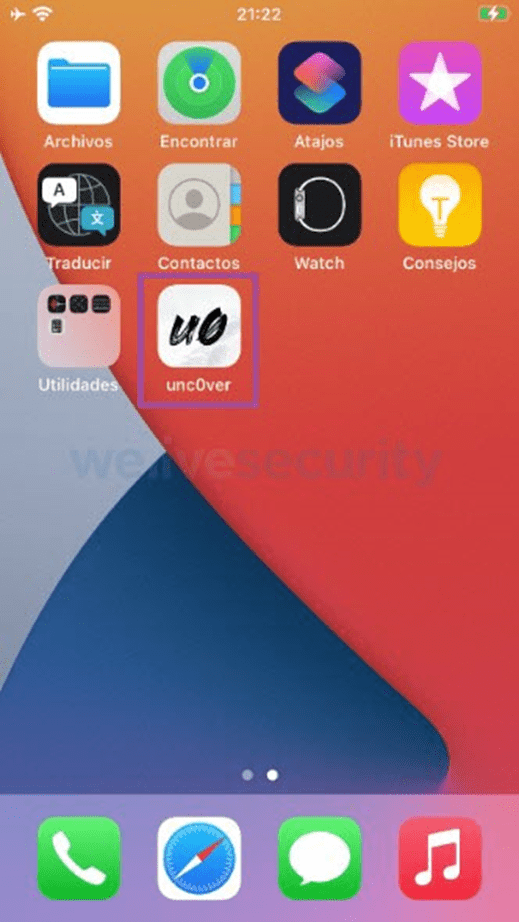
We will open the Unc0ver application and, as shown below, the menu warns us that thirty steps will be necessary for the jailbreaking process. We press the Jailbreak button and observe how all of them are completed.
Once the 30 steps of the installation are finished, our device restarts. When we start the system we will see the Cydia repository installed in our springboard , which we will access to verify its correct installation and terminate the jailbreaking process.
As we could see, this method is a bit more cumbersome than Checkra1n, but it is an alternative that we must handle. As we have said, when it comes to jailbreak we will always coexist with very unstable variables that force us to have an ace up our sleeve. Now, continuing with the different alternatives to jailbreak according to the available resources, below we will see how to install on our device, through another mechanism, the IPA file (Unc0ver) from the use of the Xcode IDE and other tools that we will see later.
Jailbreaking with Unc0ver and Xcode
In this case we will need our AppleID again and the idea will be to create a test project in Xcode configuring our valid developer provisioning profile in order to obtain the mobile provision that will allow us to sign our IPA file so that later we can install it in our device.
In principle we will connect our device to the PC and as the following image shows, we will have to verify that the account of our AppleId is started on our computer.
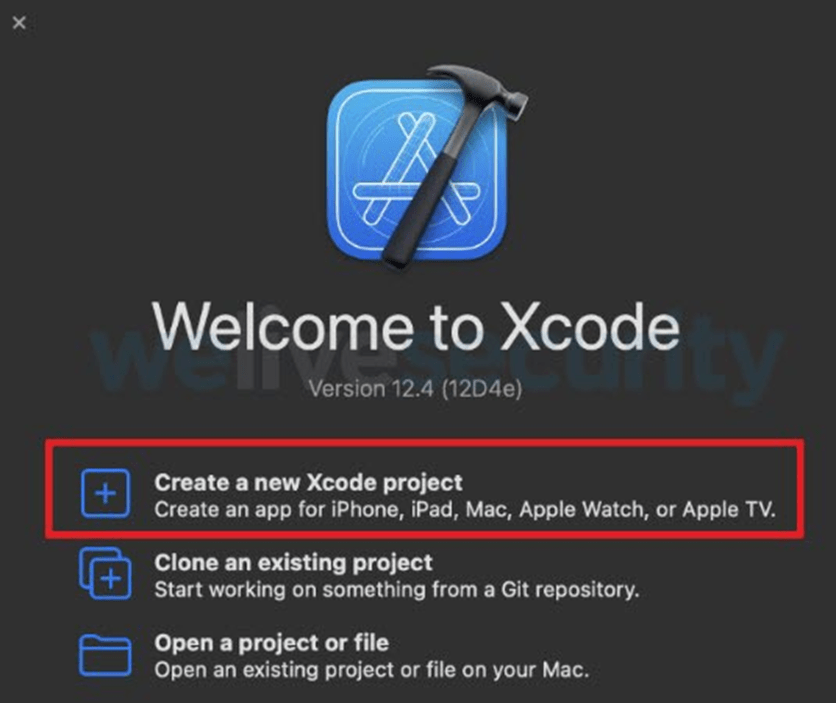
Then we will open Xcode and create our test project by selecting the option “Create a new Xcode Project” as shown in the following image:
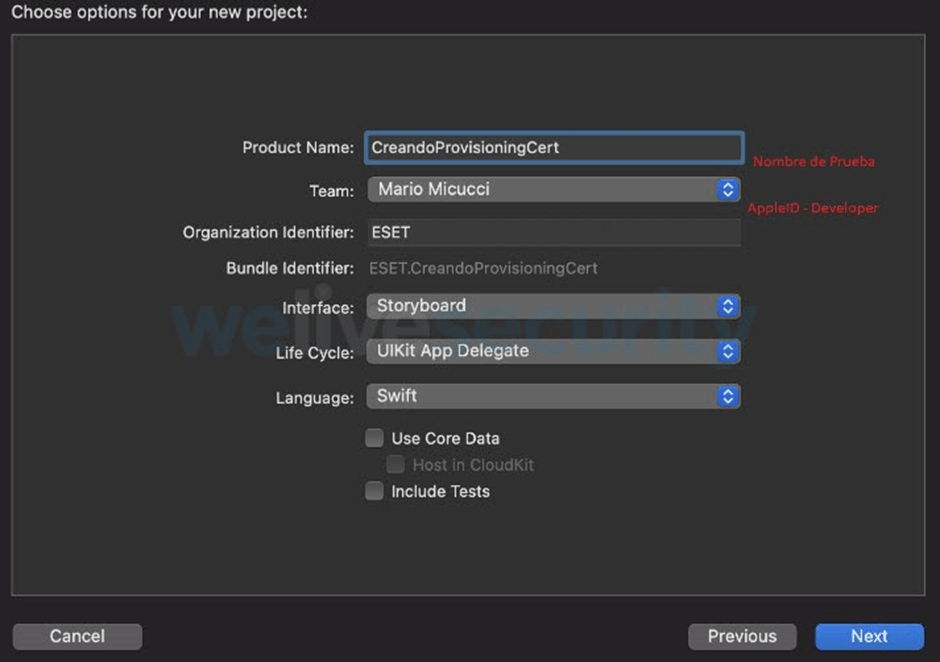
As shown below, we completed the steps to generate the project. In my case the project name is CreandoProvisioningCert . At the end we select our AppleID with development profile and complete the rest of the preferences and then click on next and thus open our newly created project.
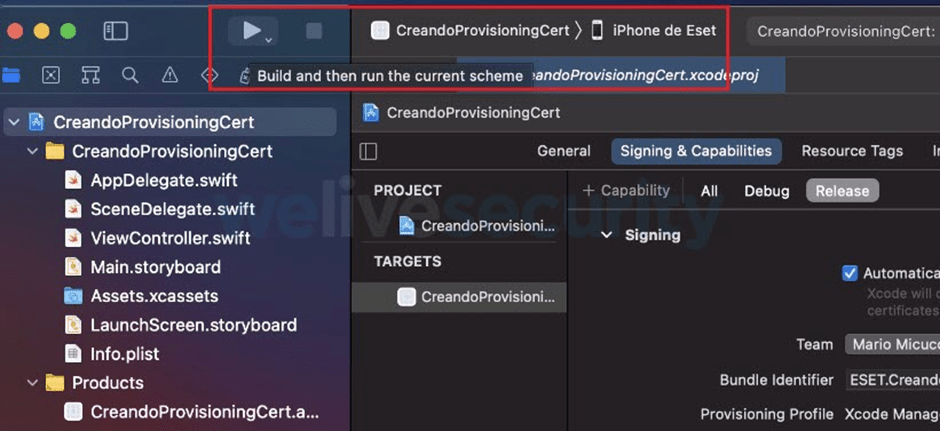
With our project created, we have to obtain our mobile provisioning to be able to sign our IPA file . As shown below, Xcode recognizes our device and we click the play button to install our project on the device and thus generate the mobile provisioning.
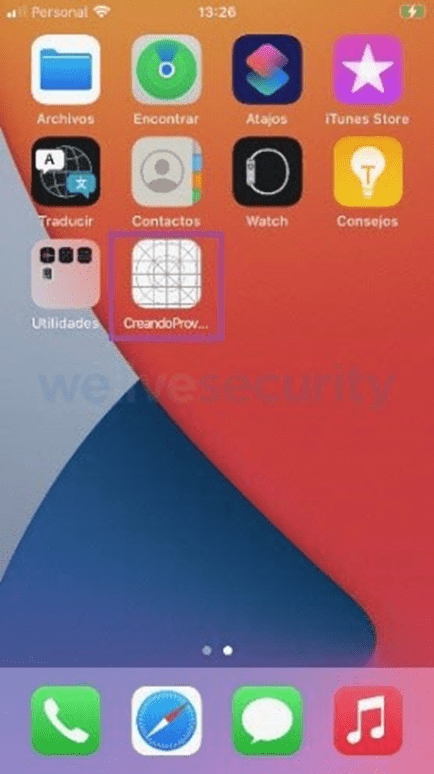
Once we click on play, the project installation process begins on our device and, as we see in Image 22, the project icon is added to our springboard.
Note: Depending on the versioning of technologies that are being used, when running the project from Xcode, the device may request to add the trusted certificate. You can see this situation on your device from the Settings> General> Device Administration menu, where you will see the certificate, which you can add as a trusted certificate.
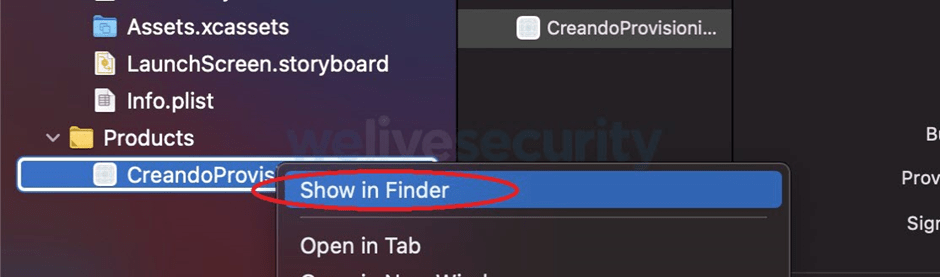
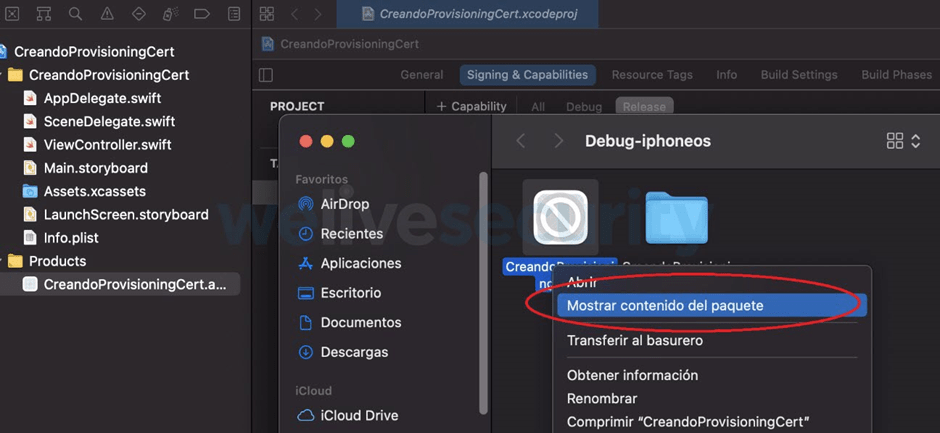
Once the project is installed we are able to obtain our mobile provisioning, so we will need to locate the Products folder (Image 23) in our project, since there we will see the application of our project and we will give it the right button to select the Show in option Finder (show in finder), as shown in the following image.
Then, as shown below, the directory in which the project application is located will be opened and again we right-click it to choose the option to show package content.
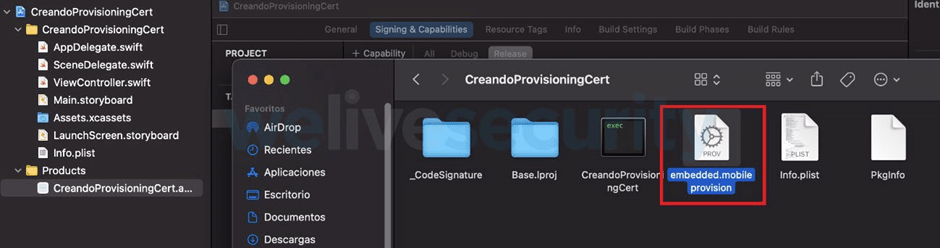
In the following image we will see that the application directory is opened and eureca, we have our mobile provisioning which, in this case, is identified as embedded.mobile.provision and we can make a copy of it in the directory we want.
As we have said before, once we have obtained our mobile provisioning we will use it to be able to sign our IPA file (Unc0ver). In this case, to carry out this process we will use a tool called applesing , which will use the mobile provisioning that we obtained to carry out the signature of the Unc0ver IPA file so that later we can install it.
We open a terminal and put the following syntax:
./applesing.js -w -c -m embedded.mobileprovision Unc0ver_Relesae_6.1.2.ipa
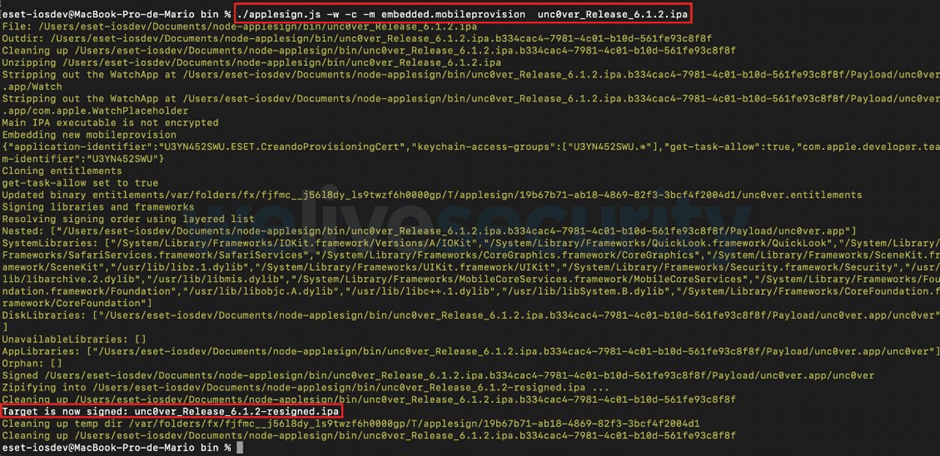
Note: in this case both the mobile provisioning and the Unc0ver ipa file are in the same applesing directory. Place the appropriate routes according to your case.
As we can see, a new IPA called Unc0ver_Release_6.1.2-resigned.ipa is generated in the output of the program , which represents the version of our Unc0ver signed and ready to install on our device, a process that we will carry out using the ideviceinstaller tool .
With our device unlocked, as shown in the following image, we will execute the following syntax ideviceinstaller -i Unc0ver_Release_6.1.2-resigned.ipa that will carry out the installation process of the IPA file on our device.
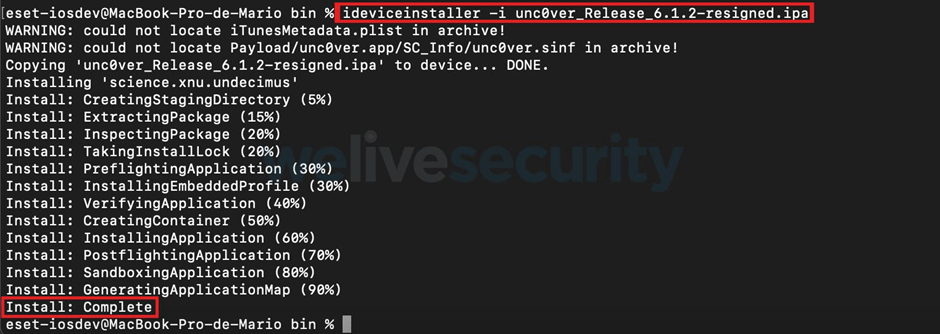
Once the process is finished, we will see the Unc0ver application installed on the springboard of our device, which we can execute as we have seen in the previous case.
Undoubtedly, we can summarize this last mechanism as the most cumbersome of all that we have seen, although it is no less necessary since it can help us to install IPA files on our devices, an essential task that we must handle when analyzing applications.
Checkra1n Vs Unc0ver
Regarding the use of Checkra1n and Unc0ver, the truth is that neither is better than the other, since this will always depend on the work scenario (device model, versions of operating systems, etc.). Checkra1n is what we call a Semi-tethered jailbreak and Unc0ver a semi-untethered jailbreak.
While we’ve already explained the differences at the beginning of this post, let’s go over what they are. In the case of the Semi-tethered jailbreak we know that it works with the iOS device connected to a computer and requires entering DFU mode and then running a computer application, while the semi-untethered jailbreak works by loading a dedicated iOS application on the device and It is simply enough to run it without a computer, since the signature services could be used through a mobile web browser to install the iOS application, this being really an advantage.
Another substantial difference between these jailbreaks is that, as mentioned earlier, checkra1n uses a hardware-based bootrom- type exploit called checkm8 , while unc0ver uses a variety of different software-based tfp0 exploits . Here the main difference is in which exploits they use. The exploitation of hardware,as with checkra1n, they cannot be patched, which also means that Apple cannot patch these exploits with a software update. Apple would need to physically recover all affected devices and solder new hardware onto the logic board of each device to fix this problem and essentially the affected devices can be jailbroken for life, regardless of what firmware they are running. Regarding the use of tfp0 in Unc0ver, as we said before, it involves the use of a variety and series of exploits that are based on software, which means that they can be patched by Apple software updates. For this reason, in this case Unc0ver must add support for the new versions of iOS that are coming out, a situation that often generates that every so often we run out of jailbreak support for many versions of devices and versions of iOS given the speed it handles. Apple to patch its vulnerabilities.
Conclusion.
Despite these differences, we can also say that Checkra1n and Unc0ver share some characteristics. For example, both jailbreaks need to be redeployed if the device is rebooted, and also both can be reversed with rootFS restore or system restore. On the other hand, both receive regular updates with new support and bug fixes and install the Cydia package manager by default, which, as we mentioned, will allow us to obtain the necessary tools to carry out our tests.
As we saw, there are different ways to get to a successful jailbreak. Regardless of which path we choose to jailbreak, the truth is that this type of mechanism always requires a lot of patience on the part of the pentester and, as we said before, it will always be necessary to have an ace up your sleeve.
It is important to avoid memorizing the use of the tools and their different forms of execution and to focus rather on how they really work according to their characteristics. In addition, be attentive to the details of each of the phases of the security chain that we have to deal with when we jailbreak in order to gain a broader strategic field and with many more resources.
Be that as it may, the truth is that we already have our device with a jailbreak and it is natural that questions such as, now what should I do? How do I start to analyze my applications? These questions, among other related ones, will be addressed in the next installments of this series on pentesting in iOS applications.